|
|
|
Correcting Printer Colour Casts
Modern photo inkjet printers can give good results at minimal cost. However things can go awry if you use compatible cartridges or bulk ink to refill them as the dyes may not be identical to the ones used by the manufacturer. Ideally each printer/ink/paper combination should have an ICC Profile which is applied in Photoshop or through the printer driver, but these are only available with more expensive inks. To create your own profile requires a spectrophotometer (£1,000) and profiling software. Alternatively you can post your printed colour patches for Remote Profiling to Epson for £100 - small companies are a little cheaper (a good business opportunity waiting out there for some young entrepreneur). The method I use requires a photographic grey card (£5.49 from Jessops), and good colour vision.
Firstly you need to create a grey image. Use this Grey Test or create an RGB image in Photoshop. Select R 127, G 127, B 127 with the Color Picker and paint the image. This will create a perfect mid-grey image. If it doesn't look grey the monitor can be adjusted with Adobe Gamma in Control Panel although this won't affect the print. Print the Grey Test image in one corner of your paper - an inch square is quite adequate. With my Epson Stylus Photo 890 the first couple of test squares often print with an added cast until the printer settles down.
You now have to decide what colour it is! Judging colours objectively is very difficult although subjectively it is very easy, which is why a photographic grey card is useful for comparison. It is essential that the comparison is made in daylight by a person with good colour vision. If the print is the same colour as the grey card then fine - being lighter or darker doesn't matter. It is far more likely though that the print will have a colour cast.
Removing the Colour Cast
First you have to decide the predominant colour of the cast - RED, GREEN, BLUE, CYAN, MAGENTA, YELLOW. (Cyan and Magenta are really just television engineering speak for turquoise and purple, so these guys don't sound like kindergarten kids mixing up paints!) We then use the printer software to reduce that colour. (Do not make colour adjustments to the application e.g. Photoshop as the correction will vary for each type of media.) Using an Epson Stylus Photo 890 the Main dialog box looks like this. Click the Custom button, then the Advanced... box.
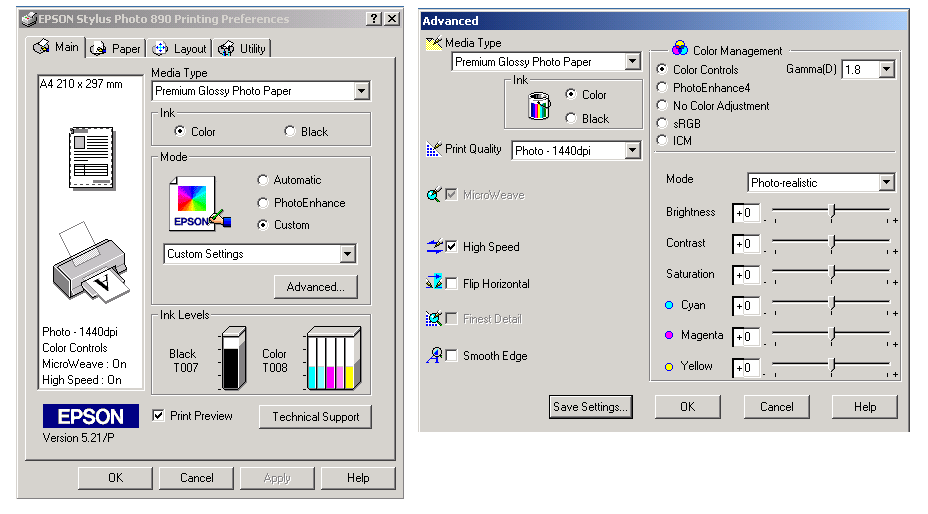
The Advanced dialog box will open. Click Colour Controls and select Photo-realistic as Mode. I have assumed that we will be using Premium Glossy Photo Paper as this gives the best quality colour prints. What the Colour Controls don't show are the colours at each end of the sliders. It should look like this.
RED ------------------------- 0 ------------------------- CYAN
GREEN ------------------------- 0 -------------------------MAGENTA
BLUE ------------------------- 0 ------------------------- YELLOW
Suppose our Grey Test prints with a magenta cast. To correct this we need to increase the complementary colour which is green. To do this we print our test squares with magenta set to -5%, -10%, -15%, etc until we remove the magenta cast. Eventually a green cast will be introduced. By using smaller and smaller increments we can find the point where the magenta cast is just removed before it turns green. Conversely, if a green cast was present initially we would increase magenta. Occasionally a second colour cast may need to be removed after the first by the same process.
There is one possible snag here - what if the magenta cast cannot be entirely removed at the limit of -25%? We would then increase cyan and yellow together (= green) until the cast is removed.
Remember that printing uses subtractive combinations, like mixing paint at kindergarten, which make the combined colour darker.
CYAN + MAGENTA = BLUE CYAN + YELLOW = GREEN MAGENTA + YELLOW =RED
CYAN + MAGENTA + YELLOW = BLACK
Most printers use separate black ink as combining colours never gives a perfect black.
If you have Adobe Photoshop and a scanner the correction process can be adjusted more finely than by eye. Scan your test print with the photographic grey card. Open the scanned image in Photoshop and select the Eyedropper Tool. Open the Color dialog box (Window, Color) and click the Eyedropper Tool on the grey card. The Color dialog box should show equal amounts of RGB (unfortunately mine doesn't). Then click on the test squares to measure them. It doesn't matter if the numbers are different from the grey card - low values give a darker grey and high values a lighter grey. By adjusting the printer to give equal values for RGB the colour cast will be removed.
Once the colour cast is removed, brightness, contrast and saturation can be adjusted as required by doing test prints. Then click on Save Settings.. and save as Premium Glossy or whatever media you are using. The next time you print, click Custom in the Main dialog box, select Premium Glossy from the pull-down menu and the Color Controls will already be adjusted. I cannot distinguish printing at 1440 dpi from 2880 dpi with Premium Glossy except that it takes forever at the higher resolution.
Inkjet v Photographic Prints
It's no contest! No matter how well calibrated an inkjet is it can never match a photographic print for accuracy of colour rendering - although photographic colour prints in monotone are not a patch on the old silver halide ones. Inkjets cannot produce an accurate black and white or sepia print unless a dedicated printer is set up with monotone cartridges, which requires additional software. Some models now have grey ink for cast free monotone printing but this is only common on upmarket A3 and above printers. The Canon Pixma MG6250 and 8250 (6220 and 8220 in US market) are the only grey ink A4 printers at the time of writing (July 12), which incorporate a scanner. Refillable cartridges with auto reset chips are now available for these models from third party vendors on eBay, together with bulk ink. The only downside is that Canon enforce 35 mm margins at the top and bottom of Fine Art Papers, reducing the longest dimension to 227 mm.
So unless you need A3 or monotone prints it's a lot less hassle to take the camera media into Boots or Jessops.
Digital Cameras and Scanners
Images from digital cameras should not normally require colour correction. Jessops 8"x10" Grey Card has a white side on the reverse which can be used for setting the white balance on digital and video cameras. If necessary an extra photograph can be taken including the Grey Card in the scene. Adjustments to the image can be made in Photoshop with Color Balance (Ctrl + B) using the method described above. Remember to calibrate the monitor first with Adobe Gamma in Control Panel.
With flatbed scanners the Grey Card can be placed in one corner and adjustments made in Photoshop as above.
Other issues
The major running cost of inkjet printers are the ink cartridges. I purchased a set of refillable cartridges and bulk ink on eBay for my Epson Stylus Photo R200. They are fitted with auto reset chips which reset automatically when the level drops too low, and they can be refilled in the printer with syringes which avoids getting air into the system - an operation best performed in the kitchen wearing gloves.
A lot of exaggerated claims have been made about digital cameras. I find that my 4 Mega Pixel camera will give an acceptable A5 print and a rather fuzzy one at A4. The average human eye can resolve 7 lines per millimetre and an inkjet can print at this resolution. At least 2 pixels are required to resolve each line. My camera's resolution is 2272 x 1704. So it can resolve around 1136 x 852 lines. At 7 lines per millimetre this gives a print size of 162mm x 122mm (6.5" x 4.9"). Anything larger will not be sharp at close inspection. Better results can be obtained by scanning 35 mm transparencies with a decent scanner (colour negative film has much lower resolution).
<Other sites by the same author:
www.customsrogues.20m.com PDF version
www.difficultyswallowing.20m.com
www.mescaline.20m.com PDF version